Publish R blogdown by Netlify
I’m a noobie on using Github and Hugo. 😊 It took me quite a while to figure out how to use version control on Github through Rstudio. In this blog, I would like to share my obstacles on publishing website to Github and deploying my website by Netflify. Some of the obstacles were caused by not understanding the structure and workflow of Github/Blogdown because I took a shortcut by googling and trials & errors and didn’t have patience to read all the details of the Yihui’s excellent guidelines. If you are a really new user as me with no website experience, hope this blog is helpful for you. You can skip some of the dump obstacles that you hopefully will not run into. 🙏
Make sure your R and Rstudio version is up-to-date. Here you can find how to update R and Rstudio.
Steps of creating blogdown in Rstudio, github repo and Netlify
General steps Recommended:
- I highly recommend you create a Github repository before you create blogdown as we have to use Github repo
<repo name>to store all blogdown source files and deploy the_public_folder by Netlify.Here are the steps that needs to pay attention when using Github:
- Click the Clone or download green button and copy URL.
- In Rstudio terminal Change directory to Github repo you just created
<repo name>by usingcd <repo name>. - Run
git clone <GitHub URL>to clone new repository.
- Build your blogdown in R Studio. I believe this step is easy to find either by watching the great RStudio Blogdown Webnair Video 2018 to get started or read some parts in the book by Yihui. You can refer to my previous blog about change to your own logo. You should decide if you will use R markdown or Markdown for each blog.
- A tip to select multiple items to commit is by
git add .1 andgit commit -m "your message"andgit push origin masterin the terminal. - Add a file for the post that contains pictures. To reference the picture from the post, a folder
imgshould be created under the folder -staticand you can reference it as for example,. - Sometimes the
Viewerdoesn’t display the content. What worked for me is that I restart the R session and render my post withblogdown::serve_site()manually in the Console.Also, try to update packages by usingupdate.packages(ask = FALSE, checkBuilt = TRUE) - My post that’s written by R markdown doesn’t generate html file and then the blog coudln’t be deployed. so by manually Knit to html to generate the file solved the problem.
- Add emojis. In
config.toml, putenableEmoji = trueto enable the function. You can find emoji cheatsheet here.
- Deploy the website on netlify for free requires below steps:
- Create a netlify account by linking with Github
- Name your website in
config.tomlfile underbaseurl =. followed by the netlify subdomain.netlify.com/. Remember to have backslash “/” at the end. - Add the build settings. Push the “hugo” as the Build command and “public” as the Publish directory.
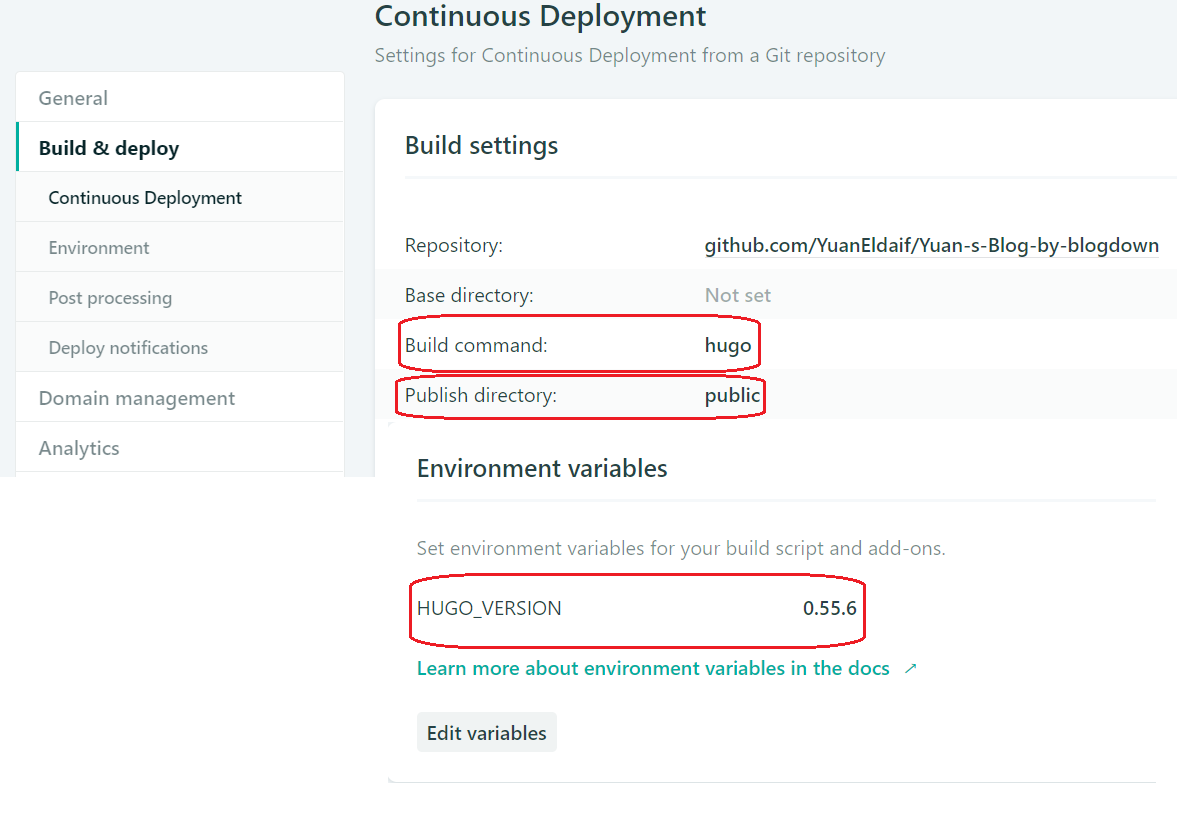 #{idth=800px height=600px}
 - check Hugo version
blogdown::hugo_version()
Hope above solutions are helpful to you. 🍻
There is a space between “add” and “.”↩
Yuan Du
Senior Data Scientist
My interests include applied Statistics, Machine Learning, Deep Learning and Healthcare.